Lava Lamps

You can make your own lava lamps at home with 3 different recipes. Each experiment produces a chemical reaction that causes “lava” to bubble up!


*Tips: If you don’t want to waste too much oil you can use less and still have great results, plus you can also use a narrow glass that holds less liquid for the experiment.


Alka-Seltzer Lava Lamps

Supplies

Alka-Seltzer or similar antacid (active ingredients are baking soda and citric acid)

clear glass/bottle

oil (any cooking oil or baby oil will work)

water

food coloring

spoon


Instructions

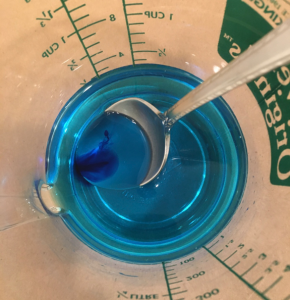
  1. Fill a glass 2/3 full of oil
  2. Fill the rest of the glass with water
  3. Add a few drops of food coloring and stir with a spoon, watch as the oil and water separate with the dye only coloring the water
  4. Break an Alka-Seltzer tablet into four pieces and drop one in

*Discuss the bubble reaction, when the tablets dissolve they react to the water creating carbon dioxide which bubbles up through the oil pulling some of the colored water with it, when it reaches the surface the carbon dioxide is released and the dyed water floats back to the bottom of the glass.

  1. Drop your remaining Alka-Seltzer pieces into the glass, one at a time, to see the bubbly lava again

*I unfortunately did not have Alka-Seltzer tablets at home to provide photos for this recipe, but keep reading  to see 2 more great lava lamp experiments!


Baking Soda & Vinegar Lava Lamps 

Supplies 

baking soda

clear glass/bottle

oil (any cooking oil or baby oil will work)

vinegar

food coloring

spoon


Instructions

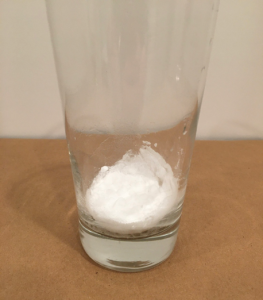
  1. Add about a TBSP of baking soda to cover the bottom of glass

baking soda in glass


  1. Pour oil gently on top of the baking soda so you do not disrupt the first layer

oil in cup


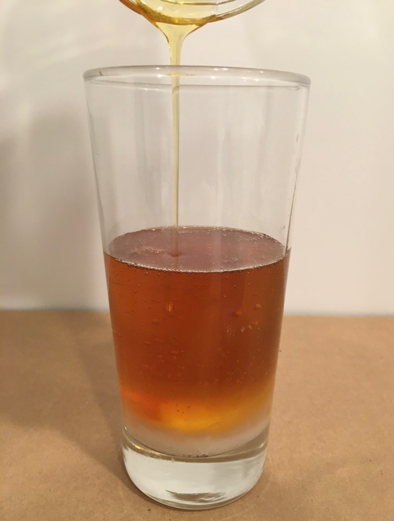
  1. In a separate container mix about ¼ cup vinegar with food coloring

blue dyed vinegar


  1. Slowly spoon a few drops of vinegar into the oil glass and watch to see what happens

lava lamp reaction


*Vinegar is denser than oil so it sinks below the oil, but when it reaches the bottom of the glass it reacts with the baking soda causing carbon dioxide bubbles to form

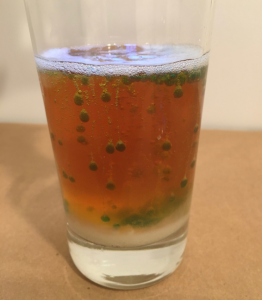
*After some time, I decided to pour more vinegar into my glass to see what would happen

lava lamp reaction

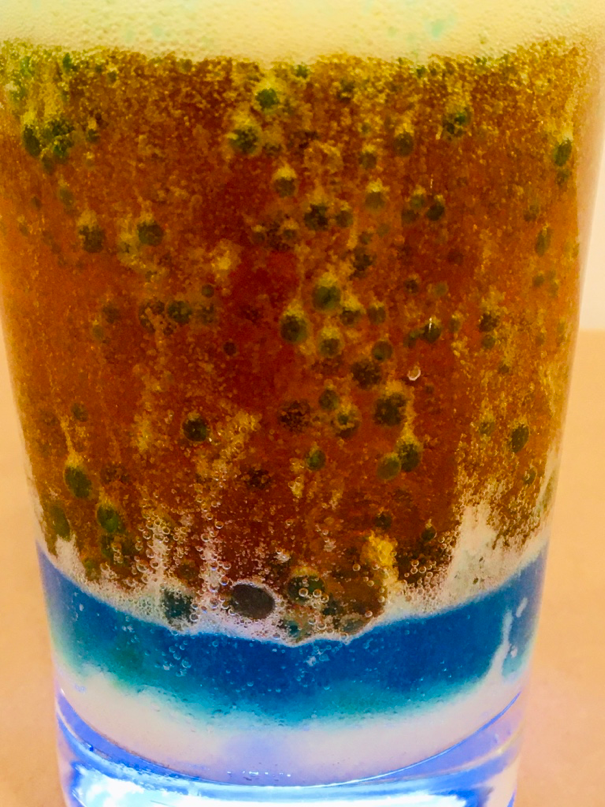
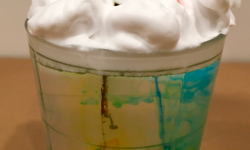
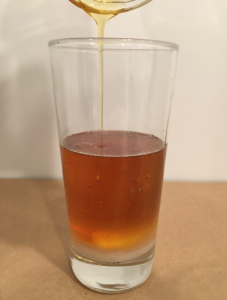
*Can you see all the layers in the glass? At the bottom is the white baking soda, then the blue vinegar, and then the gold oil.


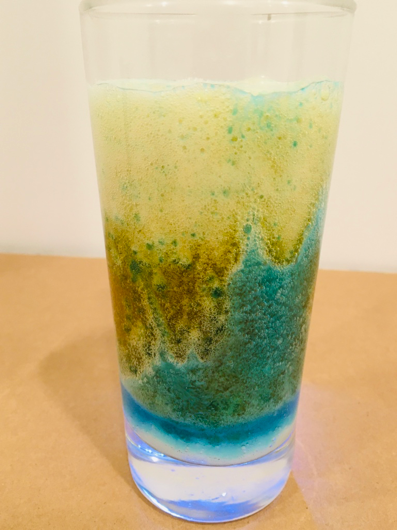
*As the baking soda and vinegar began to react the glass began filling with a surge of blue and white bubbles filling the glass in a very cool way.


Salt Lava Lamps

Supplies

salt

clear glass/bottle

oil (any cooking oil or baby oil will work)

water

food coloring (I would not recommend water colors, I tried them in the sample and they made the water too murky)


Instructions

  1. Fill a glass 2/3 full of water
  2. Fill the rest of the glass with oil
  3. Add a few drops of food coloring

*Notice how the dye only colors the water and not the oil.

*Notice that the oil floats on top of the water, even if you stir the oil and water together they will separate with the oil on top, this is because oil is less dense than water.

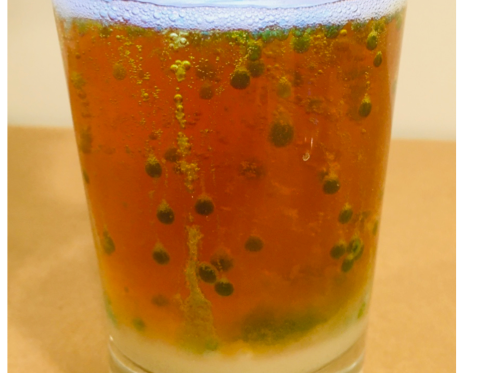
  1. Add pinches of salt to the glass and watch to see what happens

*As the salt falls through the glass it will weigh down the oil and pull it down into the water, when the salt disintegrates in the water the oil will bubble back up in the glass.


*This sample has less dye so you can see the salt settling at the bottom of the glass and bubbles coming up into the oil layer


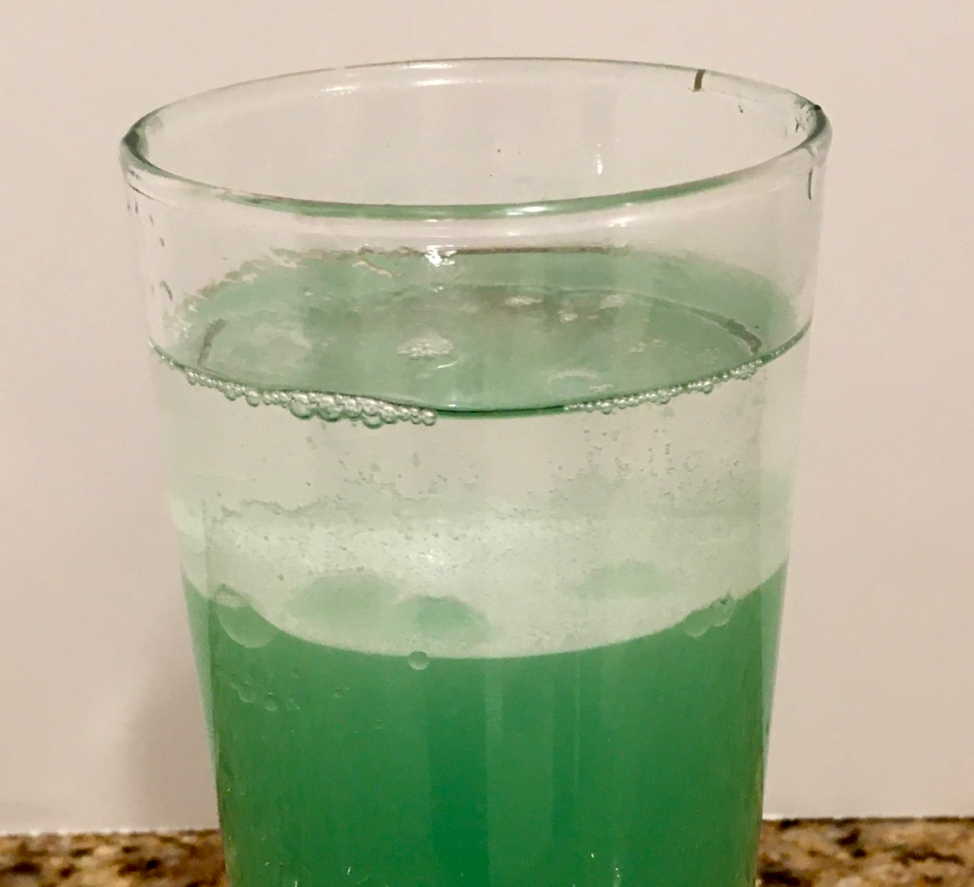
*Notice the little eruptions within the oil layer


Looking for more fun science experiments? Check out our free eBooks on videos on Overdrive

For more exciting activities sign up for our free Spring Reading Program to complete missions and earn rewards!


Traducción al Español de Lámpara de Lava

Tú puedes hacer tu propia lámpara de lava en casa con tan solo tres diferentes recetas. ¡Cada experimento produce una reacción química que causa que la  “lava” flote hacia arriba!


Recomendación: Si tú no quieres desperdiciar mucho aceite, tú puedes usar menos y aun puedes tener buenos resultados, además, también puedes usar un vaso de vidrio más angosto y usar menos líquido para el experimento.


Lámparas de Lava  con Alka-Seltzer

Material:

Alka-seltzer o un antiácido similar (los ingredientes activos son bicarbonato de sodio y ácido cítrico)

Un vaso transparente de vidrio/ botella

Aceite (cualquier aceite para cocinar o aceite para bebé)

Agua

Colorante vegetal

Cuchara


Instrucciones

  1. Llenar el envase de vidrio unas  2/3 partes con aceite
  2. Llenar el resto del envase con agu
  3. Agregar unas cuantas gotas de colorante vegetal y mover con una cuchara, ve como el agua y el aceite se separan con el colorante mientras se pinta el agua.
  4. Parte un Alka-Seltzer en 4 pedazos y agrega un pedazo al agua.

*Discute la reacción de las burbujas, cuando las tabletas se disuelven, producen un reacción con el agua creando dióxido de carbono, el cual burbujea subiendo a través del aceite llevando el agua coloreada con él. Cuando alcanza la superficie el dióxido de carbono es liberado y el agua coloreada flota nuevamente al fondo del envase.


  1. Agrega el resto de los Alka-Seltzer en el envase, uno a uno, para ver como burbujea la lava otra vez.

*¡Yo desafortunadamente no tengo Alka-Seltzer en casa para mostrarles fotografías de esta receta, pero sigan leyendo para ver 2 experimentos de lava a continuación!


Lámparas de Lava con Bicarbonato de Sodio y Vinagre


Material:

Bicarbonato de sodio

Envase de cristal/ Vaso/botella

Aceite (cualquier aceite de cocina o para bebé)

Vinagre

Colorante vegetal

Cuchara


Instrucciones

  1. Agregar más o menos una cucharada de bicarbonato de sodio para cubrir la parte inferior del vaso. baking soda in glass
  2. Vierte el aceite suavemente  el bicarbonato de sodio para que no se destruya la primera capa.oil in cup
  3. En un envase por separado mezcla un ¼ de taza de vinagre con colorante vegetalblue dyed vinegar
  4. Lentamente agrega unas gotas de vinagre en el vaso con aceite y observa que es lo que sucede.lava lamp reaction

*El vinagre es más denso que el aceite así que se hunde por debajo del aceite, pero cuando llega al fondo del vaso, reacciona con el bicarbonato de sodio causando la formación de  burbujas de bicarbonato de sodio.

* Después de algún tiempo, decidí agregar más vinagre en el envase para ver qué pasaría.

lava lamp reaction

*¿Puedes observar todas las capas en el vaso? En el inferior está el bicarbonato de sodio, y en seguida el aceite dorado.

¡En cuanto el bicarbonato de sodio y el vinagre comienzan a reaccionar el vaso se empieza  a llenar con una oleada de burbujas azul y blanco llenando el vaso en una forma asombrosa!


Lámparas de Lava de Sal

Material

Sal

Envase de cristal claro/Vaso o Botella

Aceite (cualquier tipo de aceite o aceite para bebe funciona bien)

Agua

Colorante vegetal (no recomiendo acuarelas, las probé en la muestra e hicieron la muestra muy turbia)


Instrucciones:

  1. Llena el envase unas 2/3 partes con agua
  2. Llena el resto del vaso con aceite
  3. Agrega unas cuantas gotas de colorante vegetal

*Nota como el color solo pinta el agua y no el aceite

*Nota que el aceite flota encima del agua, aun si tú agitas el aceite y el agua juntos, ellos se separaran del aceite de arriba, esto ocurre porque el aceite es más denso que el agua.

  1. Añade piscas de sal al envase y mira que es lo que pasa.

  • Cuando la sal cae en el vaso, va haciendo el aceite pesado y va jalándolo hacia abajo en el agua, cuando la sal se desintegra en el agua, el aceite hará burbujas y flotaran hacia arriba.

  • Este vaso tiene menos color para que puedas apreciar como la sal se va concentrando en la base del vaso y las burbujas comienzan a flotar hacia arriba entre las capas de aceite

  • Nota la pequeña erupción dentro de las capas de aceite.


¿Estás buscando más experimentos de ciencia? Revisa nuestros libros en línea o nuestros videos en Overdrive.

¡Si quieres más actividades emocionantes, regístrate en nuestro Programa Gratis de Lectura de Primavera, completa misiones o retos y obtén recompensas!


SHARE THIS:
FacebooktwittertumblrmailFacebooktwittertumblrmail

Rainbow Walking Water

Watch a rainbow come to life! This simple experiment creates a colorful reaction using a few household materials. Use the primary colors and see how the secondary colors emerge when water “walks” out of cups with the aid of paper towels.   Supplies: 6 clear cups/bowls/containers food dye (red, yellow,…

Continue reading

Shaving Cream Rain Clouds & Marble Art

Shaving Cream Rain Cloud Supplies: a clear glass/cup/bowl/jar shaving cream (you can use whipped cream, but it may make the water murky) liquid food color or liquid watercolors (if you only have gel food coloring mix it with water before using it in the experiment) water optional, pipette or spoon…

Continue reading

Free Resources for Families! Traducción al Español al Final

Do the days seem to be blurring together? Do the kids need something to do? Here is a list of things that are available for free to use at home! ABCMouse This one is subscription-based. BUT you can get a 30-day free trial It is for children ages 2-8 and…

Continue reading

Baby Shark!!! (Traducción al Español al final)

Make the whole Baby Shark family and put on your own puppet theater musical!

Shark Character Puppets

Supplies:

  • color construction paper (if you don’t have color paper you can use white paper and color your characters with markers/crayons/color pencils)
  • glue stick (tape or liquid glue will work)
  • something to make large and small circles (a compass or any cylindrical bottles/cups/jars you find at home can be used to trace circles, you can decide on their sizes, mine are approximately 3″ and 2″ in diameter)
  • scissors
  • pencil or pen
  • optional: Popsicle sticks (unsharpened pencils will work)
  • optional: googly eyes
  • optional: a shoebox to make a diorama
  • optional: white color pencil or crayon to draw teeth
  • optional: markers/crayons/color pencils to add details

shapes needed to make each shark

Instructions for Each Shark:

  • select a color for your shark
  • cut two large circles of the same size, one from white paper and one in your selected color
  • cut two small circles of the same size, one from red paper and one in your selected color
  • cut out a triangle in your chosen color
  • cut the white and red circles in half (you will only need a half circle of each color per shark)
  • layer the white half circle over the large color circle, glue it in place
  • take the small circle, in your selected color, and cut it in half (these will be the arm/pectoral fins) tuck one on each side of your shark head and glue in place
  • take the red half circle, this will be mouth, you can add zig-zag lines to make teeth or color in teeth with a white color pencil or crayon, you can also change the shape of the mouth to make a smile, it’s up to you!
  • once the mouth is in place glue the googly eyes or make some out of white paper by cutting tiny circles with black marker dots in the center
  • now glue the triangle paper to the top of the shark, this will be the to top/dorsal fin

baby shark puppets

Instructions for the Little Fish:

  • cut a small circle
  • cut two triangles of the same size
  • tuck one triangle at the side of the circle to make a tail
  • cut the other triangle in half, tuck one at the top of the circle and one at the bottom to make the fins
  • decorate a face
  • optional, trace the outline of the completed fish to make a second fish cutout, decorate this one with a different facial expression and attached it to the back of the first fish
  • don’t forget to glue the Popsicle stick in between

Instructions for the Ocean Scene:

  • use a sheet of blue construction paper
  • cut out anything you want to see in your ocean scene: seaweed, coral, sand, treasure chests, anchors, mermaids, sea creatures, etc.
  • glue all your pieces onto the blue paper
  • optional, glue the blue paper to the bottom of a shoe box and wrap the edges to make an ocean diorama


2 paper sharks

Now it’s time to get musical and put on your own puppet show! Have lots of fun and try singing different variations of Baby Shark!!


sharks in shoebox

*if you make a diorama shoebox you can store your sharks and fish inside the box when you’re done playing with them 🙂


Tiburón Bebé

¡Haga a toda la familia del Bebé Tiburón y ponga su propio teatro musical de títeres!


Títeres de personajes tiburones


Materiales:

  • Papel de construcción de color (si no tiene papel de color, puede usar papel blanco y colorear sus caracteres con marcadores / crayones / lápices de colores)
  • Pegamento en barra (cinta o pegamento líquido funcionará)
  • Algo para hacer círculos grandes y pequeños (compas o cualquier botella / vaso / frasco cilíndrico que encuentre en su casa puede usarse para trazar círculos, puede decidir su tamaño, el que se ha usado aquí mide aproximadamente 3 “y 2” de diámetro)
  • Tijeras
  • Lápiz o lapicero
  • Opcional: palitos de paleta (los lápices sin punta funcionarán)
  • Opcional: ojos saltones
  • Opcional: una caja de zapatos para hacer un diorama
  • Opcional: lápiz o crayón de color blanco para dibujar dientes
  • Opcional: marcadores / crayones / lápices de colores para hacer detalles

shapes needed to make each shark

Instrucciones para cada tiburón:

  • Selecciona un color para tu tiburón
  • Corte dos círculos grandes del mismo tamaño, uno de papel blanco y otro del color que usted seleccione.
  • Corte dos círculos pequeños del mismo tamaño, uno de papel rojo y otro del color que usted seleccione
  • Recorte un triángulo de su color preferido
  • Corte los círculos blancos y rojos por la mitad (solo necesitarás un medio círculo de cada color por tiburón)
  • Coloque el semicírculo blanco sobre el círculo de color grande, péguelo en su lugar
  • Toma el círculo pequeño, en el color que usted selecciono, y córtelo por la mitad (estos serán las aletas del brazo / pectoral) coloca uno a cada lado de tu cabeza de tiburón y pégalo en su lugar
  • Tome el semicírculo rojo, esto será boca, puede agregar líneas en zigzag para hacer dientes o colorear los dientes con un lápiz o crayón de color blanco, también puede cambiar la forma de la boca para hacer una sonrisa, depende de ¡usted!
  • Una vez que la boca esté en su lugar, pegue los ojos saltones o hágalos de papel blanco cortando pequeños círculos con puntos negros en el centro
  • Ahora pegue el triángulo de papel a la parte superior del tiburón, esta será la aleta superior / aleta dorsal

baby shark puppets

Instrucciones para el pequeño pez:

  • Cortar un pequeño círculo
  • Cortar dos triángulos del mismo tamaño
  • Pegue un triángulo al costado del círculo para hacer una cola
  • Corta el otro triángulo por la mitad, pegue uno en la parte superior del círculo y otro en la parte inferior para hacer las aletas
  • Decorar la cara
  • Opcionalmente, trace el contorno del pez terminado para usarlo de patrón y cortar un segundo pez, decore este con una expresión facial diferente y adhiéralo a la parte posterior del primer pez
  • No olvide pegar el palito de paleta en el medio

Instrucciones para la escena del océano:

  • Use una hoja de papel de construcción azul
  • Recorta todo lo que quieras ver en tu escena oceánica: algas, corales, arena, cofres del tesoro, anclas, sirenas, criaturas marinas, etc.
  • Pegue todas sus piezas en el papel azul
  • Opcional, pegue el papel azul en el fondo de una caja de zapatos y envuelva los bordes para hacer un diorama del océano2 paper sharks

¡Ahora es el momento de ponerse musical y montar su propio espectáculo de títeres! ¡Diviértete y prueba a cantar diferentes variaciones de Bebe Tiburón/Baby Shark!sharks in shoebox

* Si hace una caja de zapatos de diorama, puedes guardar tus tiburones y peces dentro de la caja cuando termines de jugar con ellos


SHARE THIS:
FacebooktwittertumblrmailFacebooktwittertumblrmail

Science and Crafts for Saint Patrick’s Day or Any Day!

Using household materials, you can make Salt Crystal Paintings, Oobleck Slime, and Bubbling Fizzy Pots. If you don’t have all the supplies at home some alternative material ideas have been listed. Create, experiment, and have fun! Salt Crystal Paintings Watch your paint spread like magic through salt crystals!   You…

Continue reading

PJ Storytime at Canyon Country Library!

Join us for a fun-filled storytime on Thursday nights 6:30-7:30 pm at Canyon Country Library in the Community Meeting Room. Geared toward working parents, this special evening storytime incorporates all the excitement of our morning storytimes, but with the bonus option for children to wear comfy pajamas. Children will learn…

Continue reading